Thursday, May 5, 2011

Candle Tutorial presented by Nine


Did you love the candle that Nine created for her guest designer debut? 
Such a wonderful gift idea and she has put together a fabulous tutorial for the Stampotique fans on how you can make your own candle unique.

DECORATE A CANDLE

Matérials :
  •  white candle 
  • stamp 
  •  Memento dye ink : black tuxedo 
  • Markers (Copic, Promarker, ....) 
  • wax paper 
  • white tissue paper  
  •  heat gun

Step by step :

 Stamp the image with your Memento ink on the tissue paper


Colour your image with markers

Cut out your colored image
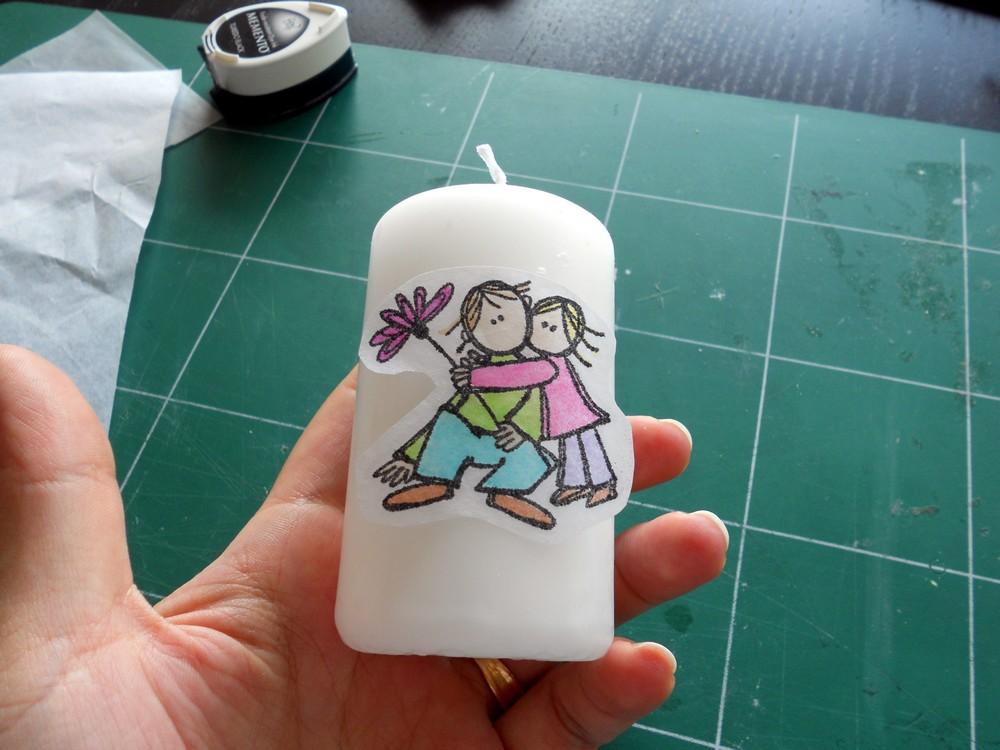

  Place your image on the candle

  Surround your candle with wax paper as shown

 Heat the image with your heat gun. When you don't see the tissue paper through the wax paper, it's Ok

 Take care, don't heat too much ! Your candle melt down.


Et voilĂ  !!!

Wednesday, May 4, 2011

Owl Post


The theme at Stamp something is Something with wings
so I thought Jo Capper-Sandon's Owl from Stampotique would be perfect as it actually comes with a set of wings to do with as you please. I have put him in flight here, in honour of the Harry Potter books and movies (I can't wait until the final movie).

I have also used Jo's text star stamp. both stamps are available from stampotique.

Tuesday, May 3, 2011

Calendar art


Minkygirl by Daniel Torrente

Every month I create a double page spread in my large art journal as a calendar page, allowing a small square for daily journaling. I often use Stampotique figures to decorate the page and this month it was Minkygirl's turn!

I stamped her with StazOn, coloured her with distress inks and then cut her out before adding to the page. I couldn't resist giving her a hat! Here she is peeping out from the corner of the page:


If you want to know more, have a look at my blog here. Thanks for looking! Kate

Monday, May 2, 2011

Pretty Puffs!


Happy Monday!

For my card, I used this adorable images Puffs by Maryse Carrier. My Papers are from The Cosmo Cricket Delovely Line and I cut my shapes with my new Cricut Elegant Edges Cartridge! How fun!


I added a smidgen of Pink Glitter to the wee flowers in the vase and a tiny button to the middle of the star shape on the die cut.


Vicki

Sunday, May 1, 2011

Welcome our May Guest Designer: Nine

Welcome our May Guest Designer, known in the stamp world as Nine.  Here is a little information about her:

My name is Nine and I live in France with my husband, my two daughters and I'm waiting for my third baby in July. I'm 30 years old and I'm a cop.

I am very happy to be the guest of this blog for May because I am a fan of the team!

I discovered the scrapbooking in 2006 and since then I have been totally addicted!  I love stamps but unfortunately Stampotique is not easy to find in France.


Nine created an Easter ensemble using Grow Girl 9069 for her focal image.  I love how these look together, what a great gift basket to give to someone.


For my first project of the month, I made 3 little things for Easter : a card, a candy bag and a candle using the same stamp.
 

For candy bag, I use the mask technique to create a field of sunflower.

For the candle, I stamped the sunflower on white tissue paper with memento black ink and I coloured with markers.
 
I cut the stamped image and I applied on a white candle then I put on it wax paper before use heat gun to fix the image on the candle.


Hop on over to Nine's blog and leave her some love or leave some here.  Didn't she do a fabulous first project??

Saturday, April 30, 2011

Bidding Farewell to our Guest Designer Heidi Downey


We bid farewell to our April Guest Designer, Heidi Downey but sharing this darling card she created.  We've loved seeing what Heidi has created with the Stampotique stamps and look forward to seeing her cards in the challenges.

Thanks Heidi!!

Heidi's card uses the following:

Thursday, April 28, 2011

There is a garden ...


Here is another piece of a floorpuzzle I altered with ink and stamps. I used distressinks and a Crafters template for the background. I 'm fond of stamps with sentiments and Stampotique has so many beautiful ones that it's hard to choose. These are the Stampotique stamps I used: There is a garden, Wed, Heart flowers and Word collage.
On the image below you can see in more detail the way I used the flower template for the background.

If you want to see the other altered puzzle piece I posted on the designer's blog please click here.


Have fun Stamping! Nellie

Wednesday, April 27, 2011

SDC29: Sketch

Over at the Stampotique Designer's Challenge blog, Kim has given us a sketch to try this week.


  This challenge is a STAMPOTIQUE only stamps week, so we encourage you to break out your Stampotique stamps and join our creative design team for your chance to add to your stamp collection with a prize of $30 gift certificate for stamps at Stampotique.  We will randomly pick a winner with the announcement of the next challenge.

With the last challenge of the month, we are bidding a few of our wonderful design team members adieu.  We wish them the best and always look forward to seeing their creations on their blog.  Thanks to each of you for being a part of the team and for sharing your love of Stampotique with others.  

 
Now to share what our guest designer created for this weeks sketch.  Hop on over to the Stampotique Designer's Challenge blog and join us by linking up with your creation of the sketch using Stampotique stamps.


Saturday, April 23, 2011

Faux water drops


In this post i will show you how to create faux water droplets on your cards. Of course you could use store bought drops but those are all the same size and to be honest,they do not look as real as these drops i hope show on this picture.

All you need is a finished card, UTEE, a heat tool and embossing ink.


Take your finished card and lightly dab your embossing pad across the card. Do not try and cover the entire card with a thick layer,just lightly dab,not pressing too hard.


Now cover your card with UTEE. It needs to be Ultra Thick embossing powder,regular embossing powder does not have the same result.


Tap off excess powder and put that back in the container.


Use your heat tool to melt the UTEE. Do not overheat the UTEE! Just melt it a bit and stop as soon as you see droplets form! If you overheat, you will create a solid layer of UTEE. ( which can also be a cool effect but it is not what we are after for now)


Rub off any crumbs that do not stick to the paper or have not melted.


Now you should have this effect. Cool faux water drops to give that watery feel to your mermaid cards!

Wednesday, April 20, 2011

It's a flowery day with Rocky

Our March guest designer Heidi Downey has created this darling card with Rocky 6032.  I love the color/shading she has created on Rocky along with the patterned papers she paired him with.

Have you joined our new Stampotique Designer's Challenge to use old book pages/newsprint on your creation?  You still have another week to join us if you haven't already.

Sunday, April 17, 2011

Over the Moon for you!


I absolutely {Heart} this clean and simple card! It's not often that I gloat on my own creations, but each time I pass this card as I'm breezing by the shelf on which it sits, I can't help but smile!

If you've been following me for awhile, you've seen this chubby little cherub before on my, because it's probably one of my all time favourite Stampotique Stamps. Baby Fleur 3 has two little siblings as well that are equally as cute!

I've been anxious to ink up this fabulous Great Moon stamp by Jo Capper-Sandon. I stamped it onto some pretty yellow DP from the Cosmo Cricket DeLovely Mini Deck as well as stamping it onto the card base. I added the sentiment in black..............and mounted sweet Baby Fleur onto the moon with dimensional dots after colouring it in with Copic Markers.

Hope this card gives you a giggle as well!

Happy Stamping

Friday, April 15, 2011

Bookmarks

Here are two simple bookmarks I made with these Stampotique stamps: Big bee, Medium bee,Large butterfly, Small butterfly,Journey collage. I colored the images with watercolor paint. On the pics below you can see how they look like when you use them to mark your pages (please click on the images to enlarge).


Have fun stamping! Nellie

Thursday, April 14, 2011

Mysterious

I'm so excited to finally have finished this project to share with you!
I'm in love with Daniel's mermaids (so wonderfully creepy!)
so I had a load of fun coloring Smushallaum! 

Smushallaum, Bubbles, World All Her Own
Please drop by my blog for more details.
Have a magical day!
Val :)

Wednesday, April 13, 2011

Another One Layer card..


I absolutely love this idea for a blog challenge. You make your card according to the theme and then, if you want to you, send your card for the charity to sell to raise money. (you can of course send extra too)
The first theme is so simple, anyone can do this one, "Say it with flowers".
I've made a one-layer card (hmmm how surprising).
I've been playing around with making inking look like fabric. Brayering onto non-glossy card gives a more irregular finish than glossy, and the drawn blanket stitch edge hopefully adds to the effect.

As I am sending this card to the charity, I have tried to go for a generic card that will sell (fingers crossed!!)
The flower (from Jo's flower Cube) and altered happy stamp are all from Stampotique .

Hope you enjoy this simple (easily reproducible!) card
Joanne

Tuesday, April 12, 2011

A Bee ON My Bonnet.


Some of you may have seen my latest Bee makes over on my blog at the weekend.

For those of you that missed it here is my bee top hat and pendant using all Stampotique stamps.

BIG BEE

MEDIUM BEE WITH TINY BEE ON THE SIDE

LEAF

HEXAGON

The Pendant uses Medium Bee again as on the hat and the quote stamp, WORLD ALL HER OWN.

Hope you like them.


For more details re other materials used please check out the post on my blog.

Many thanks x Jo CS

Monday, April 11, 2011

Altered Pencil Pots

I am constantly looking for the perfect handy containers for my art journaling supplies that I like to keep handy and not have to go looking for in a drawer or a cupboard.. so when I spotted these pencil pots from a local supermarket I just knew they would be ideal. I painted the boxes with Gesso & acrylic paint & then let the fun begin decorating the boxes..


Arty is the perfect girl for this project and she fitted onto the front of the box perfectly :)

Lying in bed.. made for the perfect sentiment for my other box.

The background was stamped with Twigs and also the Honeycomb background stamp. 

These pots were so much fun to alter and decorate.. details on my blog.Thank you for calling and leaving a comment if you get the chance. 

Have a great day. Happy crafting. Gez ♥

Sunday, April 10, 2011

Birthday Queen

After seeing the fab 'Snarky' and 'Fabulous' stamps in the new batch of stamps, I decided to use my ~{7230 Altered Alphas}~ to do a card along the same lines. I started by stamping 'Queen' onto the card and worked backwards from there.


I then used another set of alphas ~{9200 Random Acts Alphabet}~ to stamp 'birthday' onto white card and cut them out and arranged them around the card so I'd be able to use ~{6125 Minkygirl}~. She was coloured with Copics and cut out too.

I finished off with stamping ~{3046 Floral Flutter}~ and a couple of ~{3017 Crown}~'s and a rather large dose of doodling.


Kaz xxx

Saturday, April 9, 2011

Toby Is In The Pink...

...Hi again... another card using one of the new releases... and he is just adorable isn't he? His name is Toby and he was designed by Daniel Torrente... and I just love all the designs that Daniel does... Anyways... Toby is here today looking rather dapper in pink!


I computer generated the sentiment... well, real men do wear pink don't they! So, Toby was coloured with different shades of pink ProMarkers... and then I distressed the edges using pink and overstamped using the same colour with one of my favourite stamps ever... the Abstract Foliage, designed by Jo Capper-Sandon.


I made a little piece of fancy cardstock, using Distress Inks, the Abstract Foliage and then Daisy, Daisy stamped in black to make the design pop. I added a piece of border punched cardstock and then edged the main card with the same stamp again. The stamps I used on this card are:

Toby 6126
Abstract Foliage 3031
Daisy, Daisy 3002

Thanks for looking!! TTFN

Hels x

Friday, April 8, 2011

Girlfriends

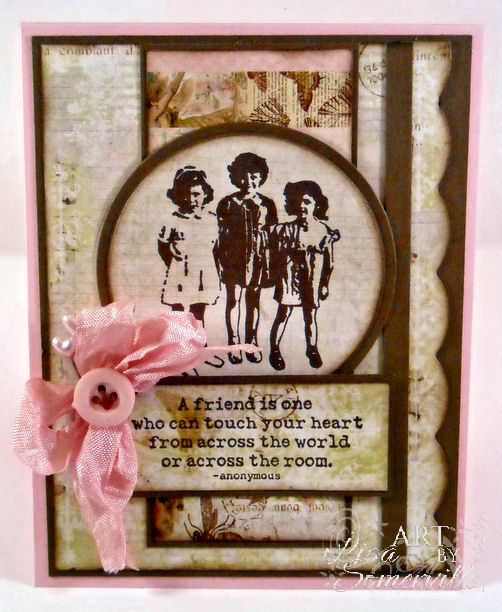
Hi, Lisa here today sharing a "girly' card using one of my favorite images from Stampotique - Little Friends.

I stamped the images from Stampotique in Coffee Archival ink on Pink Paislee papers.  The friends image is die cut from the center of the panel on my base card with Spellbinders Circle Dies, then covered with the added layers following Card Patterns Sketch.  I dyed the Seam Binding with Rangers Distress Ink Stain in Spun Sugar, added a button and some stick pins from Maya Road.

Details:
Stamps - Stampotique Little Friends, Friends Touch
Ink - Ranger Coffee Archival, Soft Suede
Card Stock - Suede, Pink Pirouette
Other - Button, Brown Twine, Maya Road Heart Pins, Seam Binding, Glue Dots, Sponge Dauber, Pink Paislee Pattern Paper, Spellbinders Circle Dies, Heartfelt Creations Butterfly-Border Die, Dimensionals, Big Shot, Ranger Spun Sugar Distress Stain